Quick Tips!

Mazda 5 Speed Manual
Transmission


Explorer Wheel Bearings


Explorer Computer Chip


Explorer Fuel Pump RFI


Explorer Dual Batteries


Cleaning Ford Explorer MAS


Explorer Caliper Slide Pins


Explorer Shock Skid Plate


Explorer K&N Filtercharger


Explorer Disc Brake Rear Axle


Explorer Body Lift Install


Explorer Dual Shocks


Explorer Steering Stabilizer


Explorer 2.5" Lift Install


Speedometer Calibration


Explorer Torsion Bar Lift


Explorer Disc Brake Swap


Explorer Rear Axle Seals


Explorer Manual Hubs


Atlas II Transfer Case
in Ford Explorer


KKM Air Filter Review

Explorer White Face Gauges


Ford Explorer Clutch
Bleeding Procedure


Spindle Nut Upgrade


Ford Explorer 2wd - 4wd
Conversion


1991 - 1994 Ford Explorer
Tire Options


1995 - 2001 Ford Explorer
Tire Options


Ford Explorer Spring Over
Axle Conversion


Ford Explorer Vibration Problems


Ford Explorer 5 Link Solid
Axle Swap Dana 44


Installing Rock Sliders on a
Ford Explorer

Ford Explorer Overhead
Console Install


4.0 Valve Clatter in Ford
Explorer and Ranger


Huge List of Maintenance Tips
for the Ford Explorer


Setting up Ford 8.8" Gears


4x4 Shift Motor Rebuild


Body Work 101 w/photos


C4 Transmission Dana 20

 Transfer Case Swap into Explorer


A4LD Rebuild Diary


Dana 44 TTB Knuckles on
 Dana 35 TTB Axle


A4LD Front Seal Info


Max Tire Size for Explorer


Ford Explorer Torsion Bar
 Removal Installation


Front Differential
R&R 1995+ Explorer

Converting R12 to R134A
 in Ford Explorer

700R4 Transmission Swap

Explorer Sport Truck

Fiberglass step by step

Wheel Offset Backspace

Wheel Spacers

IAC Valve Cleaning

Explorer Message Board
 Home PageMessage BoardBookstoreResourcesFAQTipsReviewsReaders RidesAddMore ExplorersExplorer RunsWhoopsSave TrailsLinksHam Radio


"Where the Pavement Ends the Adventure Begins"


I had been using a K&N drop in air filter in my '93 Explorer for several years, but  was thoroughly unimpressed by it's claim to increased performance. When I heard about KKM's True-Rev Sport Induction Kit I knew I had to give it a try.

KKM has been serving Ford enthusiasts for over two years. Warren Kurtz is a Ford enthusiast himself driving both a Ford Ranger and a Contour SVT. Warren opened Kurtz Kustom Motorsports because of the lack of availability of parts for his favorite Ford vehicles.

The True-Rev Sport Induction Kit has been designed to completely eliminate the restriction to airflow caused by the stock Ford airbox.

The stock intake system on a '91-'94 Explorer pulls air in from behind the grill nearly even with the passenger side headlight. The air then has to flow through a highly restrictive plastic tube finally exiting in the base of the stock air box. Besides being a restriction to air flow, the stock setup is also very prone to taking on water when crossing streams or even when traveling down flooded roads.

By eliminating the stock airbox and replacing it with a True-Rev Sport Induction Kit airflow to the engine is  greatly enhanced. A side benefit is that the air filters new location makes it much less susceptible for water to be drawn in.

The kit is well thought out, assembled with high quality components and installs easily in about an hour.

After installing the kit I noticed a definite improvement in seat of the pants acceleration. The engine has improved mid and high end performance revving quicker and more freely. I fully recommend this kit to any Ford Explorer enthusiast looking for maximum performance from their intake system. I also recommend this system to offroad enthusiasts who want to reduce the chance of taking water into their engine.

The True-Rev Kit is available for all Explorers from '91-'99 with either the V-6 or the V-8. Visit KKM's website at: www.Kustomz.com for prices and more information.


This is what is you will receive in the KKM True-Rev Sport Induction Kit. (aluminum vacuum line plug is not shown)
This photo shows the completed installation

(Click on photos for Hi-Res images)


Shown here is one of two brackets which
attaches the filter to the air box base.
Installation

Installation will vary from vehicle to vehicle due to differences in tolerances. These instructions detail my experience with a '93 Explorer.

Step 1. Remove the negative battery cable. This will prevent any shorts from occurring and will also reset your computer so it can "re-learn" the engines new air fuel requirements.

Step 2. Remove the factory airbox assembly. Loosen the clamp holding the intake pipe to the throttle body. Unplug the connector from the MAF and remove the rubber hose running between the oil fill neck and the intake pipe. Disconnect the two vacuum lines from the top of the air box. Remove the two screws holding the air box lid in place. Now you can remove the whole top half of the assembly by pulling and twisting the intake pipe connection at the throttle body.

Step 3. Unbolt the airbox lid from the MAF taking care not to damage the MAF. (This would also be a good time to clean the MAF sensor as described in my Tech Tip page). Remove the bottom half of the air box by removing the single bolt and pulling the box free from it's rubber grommets. (KKM recommends that you remove the heat riser assembly and the stock intake tube. I left mine in place in case there is a problem with emissions requirements during an inspection. Leaving it in place does not interfere with the operation or installation of the True-Rev-Kit.)

Step 4. Bolt the True-Rev adapter plate and the support brackets to the MAF. The brackets are attached to the lower half of the MAF. Leave the bolts holding the brackets slightly loose for now. Make sure the longer bolts pass through the support brackets.

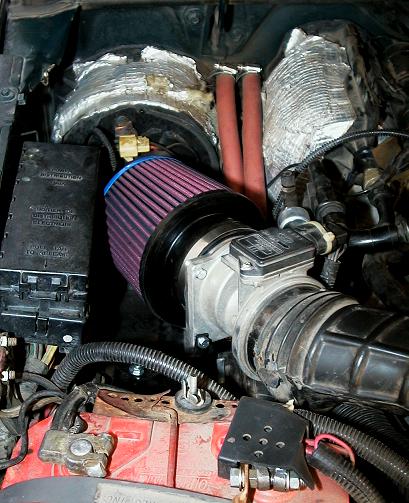
Step 5. Reinstall the intake pipe assembly to the throttle body leaving the clamp loose. Line up the brackets on the MAF with the existing airbox base plate in such a way that the air filter is unobstructed and so that the intake pipe is not interfering with any engine parts such as the alternator pulley. When you find a suitable 
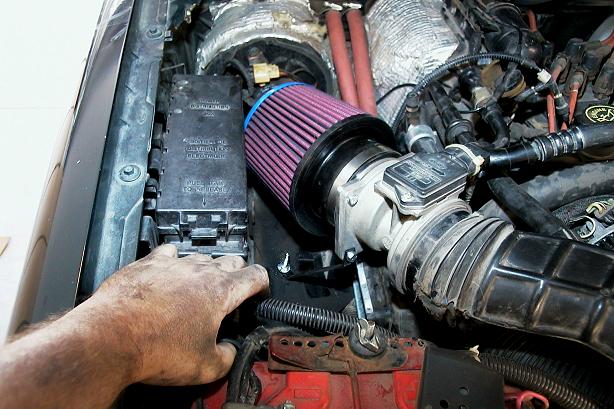
location mark and drill holes through the base plate. In my specific installation I needed to supply a 1-1/2" x 1/4-20 bolt. This bolt passed through the base plate and the inner fender well. 

Step 6. Recheck for clearance around the entire installation. If everything looks good, tighten the MAF bracket bolts, the intake pipe clamp and reinstall the MAF connector.

Step 7. Install the supplied aluminum plug in the vacuum line that was attached to the stock airbox. This is the line that runs to the manifold. The other line can be left open or removed depending if you decided to keep your stock heat riser in place or not.

Step 7. Reinstall your battery cable.

Go out and enjoy your new found power and throaty sound from the high performance intake system.