|
OVERHEAD CONSOLE INSTALLATION
by: Mark Wagner (Quick)
For
some reason, installing an overhead console in an Explorer that doesn't
have one is popular. I wanted one, and so do so many other people.
Questions like, "will it fit?" or "how do I install it?" are common.
I even asked the same questions. So hopefully this article will clear
up any questions and concerns that you might have before you take a knife
to your beautiful headliner.
Please note, this installation isn't
for everyone and isn't recommended for people who are afraid to cut into
the car. This isn't guaranteed to work on all Explorers. Models
of '93 and up only have this feature. So if you aren't sure that
you have the screw holes to mount it, pull down your headliner and check
BEFORE you cut into it.
Note: The Explorer's with a
power sunroof that have an overhead console are the pretty much the same
shape but they are little longer compared to the ones that have the "hidden
spot" that pretty much holds a garage opener. They mount a little
differently as well. The bracket is smaller to allow more room for
the motor and it has a "tab" on the send of it, which slides under the
sunroof. Ones without that just use screws that go into the mounting
bracket.
First Step
This might be the hardest task in
this whole process. You must actually find an overhead console.
It took myself 2-3 months of searching, calling and waiting before I finally
was driving around in a junk yard and saw the poor green Ford Explorer
with no engine and a frame bent pretty bad. After much ado, I got
it out. Remember you want to take all that you can.
The console
itself, with all the electronics.
The wiring harness. This
is a must because brand new, it can cost up to $500 from Ford (don't
ask me why, they are just wires). Try to get all of it if you can.
I had some trouble getting it all out. It was pretty jammed in there
so I ended up cutting it as far as I could down.
Note:
Check the wires inside the console. Due to a collision a "jolt"
of electricity may shoot up into all the electronics frying the wires and
even the LCD. With the one I found, the ground wire was fried and
there was (and still is) a dark black spot on the corner of the LCD which
didn't affect it surprisingly.
The mounting
bracket, if their is one. The Explorer I got it out of had a
sunroof so the way it is mounted it a little different, but not much.
If you don't get it, don't worry it only costs $10 from Ford.
The temperature
sensor located near the front driver side near the radiator.
It is 2"-3" long and about as thick as a cigar. It will have 2 wires
hanging out the back.
Second Step
Now that you have all the required
hardware, you will just need the basic tools. Screw driver, a sharp
knife (so you don't damage the part of the headliner you don't want cut),
and maybe a flash light.
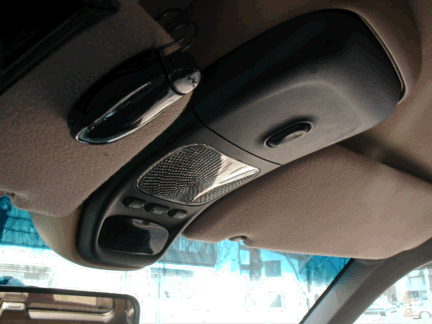
Hold the console
up to the place of mount (you many want to take down the sun visors as
well, they are in the way.) When I did was made a template
out of cardboard which is little bit smaller than the console do I don't
cut too far. After I did that, I took a piece of chalk and traced
an outline of the template.
Now brace yourself,
and start cutting away carefully following the chalk line.
You should see
two slots, and two screw holes.
Hold the mounting
bracket up to your freshly cut hole and make sure it fits without any problems.
It should be a little snug in the hole which will act as a seal.
Take two screws
and screw it in. You want it as tight so it doesn't shake or rattle
when you are driving.
Third Step
Now that the
mounting bracket is up in your hole, you must run the wiring. This
is a little tricky depending on how much of the harness you have.
Myself, I had to run my own wires. I recommend doing this with 2
people. One person laying with his/her hand reaching up under the
dash and the other person feeding the wires through the hole.
Take off the
a-pillar molding. It is held in by those little plastic holders and
metal tabs.
Run the wire
from the console, under the headliner down to the a-pillar.
Now the fun
part, connecting the wires.
There are
8 different color wires coming out of the console:
Red/Blue
Dimmer
switch:
Matches the
brightness with the rest of the interior lights. I wired this to
the same wire the bulb inside the ashtray was wired to.
Blue/Yellow
Blue/White
Temp
Sensor:
These
wires are to be ran to wherever you mount the temperature sensor.
Some mount it inside the car, some outside.
Black
Ground:
You can pretty
much attach this anywhere on the body. You pick. :)
Black/Blue
Green/Orange
Dome lights:
These wires
make the map lights go on with the door is open. The Green/Orange
wire is the wire that runs across the
top of the car to both vanity mirrors. The Black/Blue
wire is the wire that detects if the door
is open.
Grey/Black
Vehicle
Sensor:
This wire is
to be spliced into the speed sensor of the car so the console can compensate
for wind chill. I didn't attach this wire at all. I didn't
want to mess up the way my car reads the speed. The temperature sensor
reads just fine without it.
Yellow/Grey
Fuse and
Power:
This is the
main power that will go to the console. You can setup some sort of
fuse if you wish but if you splice it into anything, the thing you splice
it in will have a fuse anyway. I spliced it into the same wire that
powers on the radio.
Fourth Step
Well you are
done (lets hope). Put the key in the ignition and turn it and see
if the console powers on and reads the temp properly (it will read 0 degrees
if it isn't hooked up correctly).
Go find an abandoned
parking lot and follow the following steps:
Press and hold
the "MODE" button until you see "VAR" (takes around 5 seconds)
Release the
"MODE" button. Push the "MODE" button until you have
selected the zone you are currently in. (email
me to find out your zone, I'll soon have a map up)
Release the
"MODE" button and wait until the console is back at normal operation.
Press and hold
the "MODE" button until you see "CAL" (takes around 9 seconds)
Release the
"MODE" button.
Now the fun
part. People will think you are crazy. Drive in a circle at
around 3mph. Your console will be changing direction really fast.
Continue to do this until the console is back at normal operations.
EXPLORER HOME | MORE
EXPLORERS
|
