|
Ever since I grenaded my stock transfer case back in
'96 I was looking forward to a heavy duty replacement for
the BW 13-54. The 13-54 is a light weight chain driven
unit which does fine in all, but the most extreme
off-road environments.
One day while browsing the 4x4NOW website I saw that
Mike Partridge, General Manager of Advance
Adapters was going to be available on the "Ask
the Expert" forum. I used this opportunity to ask
Mike if he had plans for the highly renowned Advance
Adapters, Atlas II transfer case to be available for our
Ford Explorers. I told Mike about this website and about
all of the people who were very serious about making
their Explorers off-road worthy. Mike told me he would
research the market to see if there was interest.
Fast forward to the 1999 SEMA show in Las Vegas,
Nevada. I met Mike in person at the Advance Adapters
booth. I introduced myself and gave Mike my card. He
remembered me from our online discussion and told me that
the Atlas II was being built for the Ford Explorer, I was
super happy to hear this great news. Upon returning from
the SEMA show I announced the availability of the Atlas
II.. It wasn't very long before Paul Bredehoft, one of
the regulars on this website, bought the first Explorer
based unit. A 3.8:1 unit which is optimal for an
automatic equipped Explorer.
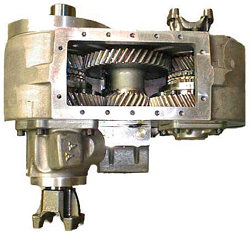
The Atlas II is available
in two configurations. "Ultra-low" 3.8:1 and
"Extreme-low" 4.3:1. The 3.8:1 ratio is
recommended for those with automatic transmissions as the
4.3:1 is so low the stock brakes would not be able to
hold the Explorer back at an idle. With a manual
transmission this is not a concern because you can simply
disengage the clutch and come to a complete stop. For
full technical details check out this page: Atlas
II.
Installation
Procedure: For '93 Explorer w/ manual transmission
1. Given the height of my truck (5.5"
lift) there was no need to put the truck on jack stands.
First I placed a floor jack under the transmission. Next
I pulled the drive shafts, transmission cross member,
stock shift lever, speedometer cable and the wiring from
the stock transfer case. At this point I supported the
transfer case with another floor jack and removed the 5
bolts holding it in place. Once the bolts were removed I
worked the transfer case free from the transmission
adapter. I lowered the transfer case with the floor jack
and slid it out from under the truck.
2. I setup the shifters on the Atlas II out of
the chassis as the Advance Adapters manual suggests. This
is to get the basic adjustment down and to get a feel for
the way the assembly fits together. Once I had the
shifters set up (10 minutes), I broke down the assembly
except for the long threaded rod, and the gold shifter
ends.
3. I used my 2-1/2 ton hydraulic jack to raise
the Atlas II close to its mounting point. Care needed to
be taken to feed the shift rail (long threaded rod) up
and over the transmission adapter. I needed to leave
clearance between the top of the transfer case and the
floor. That's because the transfer case was being lifted
in perfectly flat and once the splines were engaged and
the case was mated with the adapter the case needed to be
rotated for the bolt holes to line up. It required a bit
of wrestling to get the splines mated, but it went
together pretty easily.
4. I have the second Atlas II ever to be sold
for an Explorer. Paul Bredehoft has the first. Both of
our transfer cases were shipped with the wrong studs,
they shipped studs with SAE threads instead of
Metric which is what's needed. The original bolts from
the 13-54 are slightly too long to thread fully into the
Atlas II. I needed to get some new bolts or studs. Note:
I have spoke to Mike Partridge and he is aware of the
situation. He is now shipping the unit without studs and
recommends that the original bolts be cut. My personal
recommendation is to buy shorter bolts. My local Ace
Hardware had metric bolts which were about 1/4 - 5/16"
shorter. These fit perfect and it saves from having to
cut and use a die to clean up the threads on the stock
bolts. While you're waiting for your Atlas II to arrive
from the factory you could pull an easy to reach bolt and
use it to find a slightly shorter set at a hardware
store.

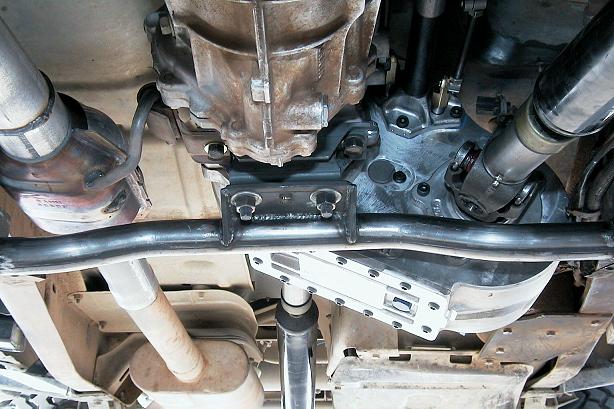
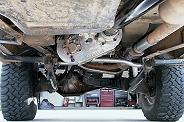
Custom
cross member
5. Reinstall the
cross member and transmission mount.My transmission cross
member was custom built after my troubles at the
Truckhaven pre-run. The new cross member lowered the
transmission quite a bit. This worked out great with the
Atlas II. I bolted everything up and there is plenty of
clearance all around the T-Case even though it's
larger than the stock unit. You will find that you will
either need to modify your cross member, build a new
one, or use a 1" body lift to gain sufficient
clearance between the new transfer case and the floor
board.
|
Notch
was made for shifter access
|

View
from opposite side
|
6. The stock
Explorer uses a CV on it's front drive shaft. The Atlas
II didn't come equipped with a CV yoke on the front so a
new drive shaft was made to the correct length (in this
case 29"). My drive shaft shop, Dick's Drive shaft
in Phoenix, assured me that the single U-joint setup
would allow more flex than the CV type, so that's what I
used. The rear yoke on the Atlas II is a CV type yoke.
Once again the CV is not needed so the rear drive shaft
was cut to the correct length and fitted with a 1310 slip
yoke made for extra articulation. A 1310 strap kit was
used to hold the front U-joint in place. The standard
1310 strap is a tight fit in the CV yoke. I told Mike
about this and he told me that he has a supplier for
special straps which are made specifically for this
situation. Mike is sending me the new straps and he plans
to include them in future kits. All of my U-joints are
now "Brute Force". The drive shafts were
installed at this point.
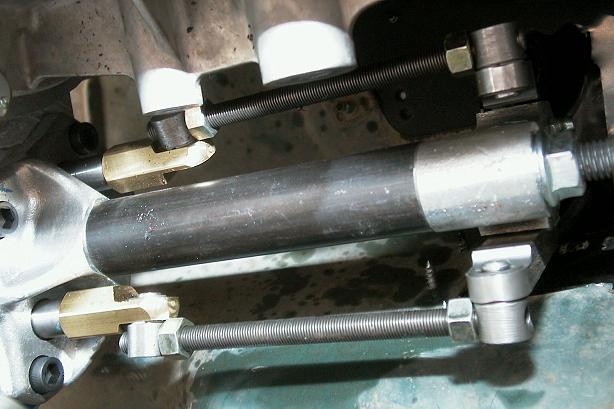
|
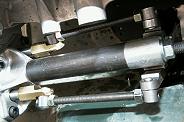
Shifter
rods as seen from the bottom
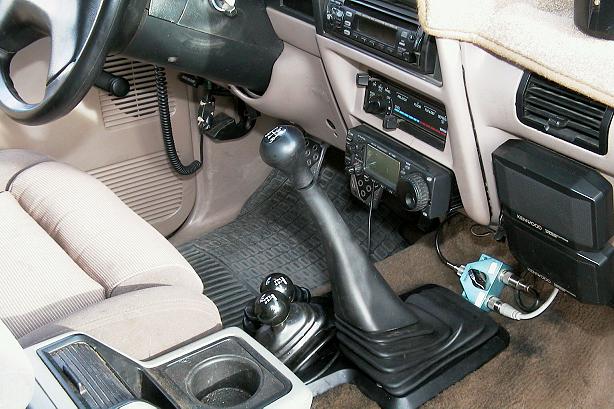
|
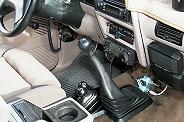
Finished
interior, nice and clean!
|
7. While the T-Case was still in place I used
my friends Sawzall to notch the drive shaft tunnel for
shifter clearance. The shifter handles which they
included were pre-bent for the Explorer. They would have
worked fine with an automatic transmission, but the
shifter for the rear axle was making contact with my 5
speed shifter handle. The fix was easy enough, I just
bent the rod with a long pipe to create additional
clearance. I completed the installation of the shifter
linkages per the instruction manual and was ready to
button up the installation.
8. The final details included patching the
drive shaft tunnel with a piece of sheet metal. I cut the
metal to size and used sheet metal screws to hold it in
place. Black silicone was used to prevent rattles and to
keep heat out. I installed the shifter boot which was
included with the Atlas II. Next I had to remove the
original transfer case shifter boot from the stock
assembly and cut the left side and the bottom from the
stock trim piece. I then fed the 5 speed shifter boot
over the handle and the Atlas II dual stick boot now
protrudes from where the stock shifter used to go.
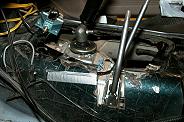
The
optional fluid level site kit is shown here
I have been off-road with the Atlas II a several times
now. All I can say is WOW. Actually I can say
more. There's a hill close to my house which has
lots of whoop-dee-doos all the way up. It stretches the
suspension pretty well as one tire goes into a hole and
the other gets picked up by a berm. Anyway I dropped it
into low range at the bottom of the hill and placed the
transmission in first gear. I let out the clutch and let
the truck IDLE all the way to the top! The RPM's barely
rose to over 500 yet the progress of the Explorer never
slowed.
This deep of a low range isn't for everyone. You give
up speed on the trail (at least in low range, high range
remains the same) for extreme torque and throttle
control. The manual transmission is much easier to
control on obstacles with the deep low range. Rock
crawling has become a pleasure instead of a chore. Let
the clutch out slowly in lowrange and get ready to move
without the need for slipping the clutch. Obstacles which
used to require revving the engine and slipping the
clutch are now accomplished with no slippage at all.
On the highway, I immediately noticed the lack of
backlash that was present with the stock chain drive
case. It also feels like a few extra horsepower have been
freed up. This could be due to the gear to gear design
and the use of bearings throughout the case.
Shifting takes getting used to, but once you learn the
system it's extremely easy and has a very positive feel.
From the look and feel of the unit I believe it's going
to be an excellent long term investment.
|