There are a few pictures I still need to complete this thread:
-Three simple, small sketches:
1) Wiring diagram to a regular on/off switch
2) Wiring diagram to a lighted on/on switch
3) Wiring diagram to a '95-'96 with a regular switch
-Pictures of alternate mounting locations for the switch
Disclaimer: I'm not an engineer for Ford, and I don't play one on TV. The
opinions expressed here are my own, and you're free to disagree with them.
Make this modification at your own risk. This mod requires some basic wiring
ability as well as some general electrical and mechanical knowledge.
First, please note that because of the design of our transfer case, our systems
are NOT designed to allow unlimited wheel spin. Allowing excessive wheel
spin (e.g. roasting tires for a city block or running Control-Trac/BWM-equipped
vehicles on a 2 wheel drive dynomometer) forces the transfer case clutch to
slip. Excessive slipping causes a tremendous amount of shearing of the
transmission fluid used in our transfer cases. This can result in burning of the
clutches as well as the transfer case lubricating oil and is NOT recommended.
Our systems are not designed to allow tire-roasting slippage of the transfer
case clutch, and doing-so can result in major mechanical damage of the system
which can require replacement of costly internal components of the transfer
case. Again, make this modification at your own risk!
Second, many thanks to everyone that has had input from the original
ExplorerForum thread. I'll do my best to include all the pertinent aspects of
the mod for the second generation Explorers. If I have omitted anything
important, please let me know and I will add it to the thread.
Third, let me make this perfectly clear: If you have a second-generation V-8
with All Wheel Drive, this mod does not work for you.
Now, for a little background.
There were three slightly different systems included in the second-generation
Explorers. The All Wheel Drive is a full-time system and cannot be modified to
be full-time four-wheel drive or two-wheel drive. The second and third systems
used in the '95-'96 and '97-'01 model years were both called 'Control Trac 4
Wheel Drive' Both systems used the (insert model here) transfer case. The
'95-'96 used a front axle equipped with a Center-Axle Disconnect, which was done
away with on the '97 model year in favor of a live axle (and fewer parts to fail
when needed most)
Depending on the operator selection, the transfer cases in both systems were
actuated by one of two GEM-controlled sources: The Torque On Demand Relay and
the Transfer Case Shift Relay. The transfer case contains a Transfer Case Clutch
Coil, which is what locks the front and rear driveshafts together. Power for the
TCCC is fed via a brown wire, hence the familiar name. The Transfer Case Clutch
draws approximately 5A of current. Make sure that all the components used in the
wiring and switch are rated for at least 10A to be safe.
|
|
Some more specific background on the two systems.
'97-'01(switch says, 4auto, 4high, 4low
The '97-'01 model years lack a true 2 wheel drive option. With a live front
axle, there are no significant mileage gains to be had by driving the rear
wheels alone. That being said, some of us simply prefer to determine when the
front wheels should drive and when they shouldn't, instead of relying on a
computer to make that decision for us.
In 4 auto, the GEM monitors the wheel speeds. When it determines that there is
wheel slippage, it sends the signal to the Torque On Demand relay to actuate the
Transfer Case Clutch Coil via the brown wire. By interrupting the power flow to
the Transfer Case Clutch Coil, you prevent the front driveshaft from locking to
the rear, hence a true two wheel drive.
Now, please note that the TOD relay is either on or off, and the Transfer Case
Clutch is either engaged or disengaged. The relay and GEM do not vary the amount
of power applied to the transfer case, they simply vary the DUTY CYCLE of the
TCC. The transfer case is either engaged or disengaged at any given moment.
When you select 4 high from the switch on the dash, the GEM sends the signal to
the Transfer Case Shift Relay to engage 4 high. This sends power directly to the
Transfer Case Clutch Coil, essentially a 100% duty cycle.
If you select 4 low, the transfer case remains locked, but engages a set of
planetary gears to obtain the low range gear reduction. The front and rear
driveshafts are still linked solely by the Transfer Case Clutch. By interrupting
the power flow to the TCCC when in 4 low, the transfer case disengages the front
driveshaft, even though the planetary reduction gears are engaged. This results
in a true 2wd low range.
'95-'96 (Switch says, 2WD, 4auto, 4 low
The system used in the early second generation Explorers was very similar to the
later second gens. The '95 and '96 model years used the same transfer case as
the '97-01 in conjunction with a Center-Axle Disconnect on the front axle. In
2wd mode, the transfer case is unlocked, and the CAD essentially breaks the
passenger side axle shaft between the front differential and the passenger side
halfshaft. That allows the front differential to stop turning, leaving the
driver's side wheel to drive only the spider gears inside the diff.
When you engage 4auto on a '95-'96, the GEM switches the signal to a vacuum
solenoid (insert picture here) which locks the CAD, thereby connecting the front
half of the drivetrain and forcing the front driveshaft to turn with the wheels.
Then, when the GEM determines that the rear wheels are turning faster than the
fronts, it momentarily locks the transfer case, linking the front and rear
driveshafts together for a period of time. The GEM then unlocks the transfer
case, checks for slipping again, and, if necessary, locks the transfer case
again. This produces some clunking and unconventional engagement and
disengagement that many people don't like.
To combat this, we simply bypass all the GEM-controlled electronics and, using a
simple switch, apply power directly to the transfer case clutch coil, again via
the brown wire.
4 low functions the same way as in the '97-'01 models. The transfer case engages
a planetary gear set, providing the low range gear reduction. Interrupting the
power flow to the TCCC will, again, disengage the front driveshaft, providing
you with 2 wheel drive low.
Now, on to the good stuff: The How-To!
Here's a list of the tools I needed to install mine. (I'm sure I'm forgetting a
thing or two, so please remind me if I forgot anything)
-Stereo Removal Tools (available from any AutoZone or WalMart nationwide)
-7mm socket, ratchet, and extension.
-Switch of your choice (must be rated for 10A or more)
-Some assorted lengths and colors of wire, (12-14 gauge should be fine)
-An assortment of bullet and/or spade connectors.
-Electrical Tape
The first thing to do is figure out where to install your switch. Many members
here have installed theirs under the seat, in the center console, in the
overhead console, or in the dash. Personally, I like my switches in the dash, so
that's what I'll focus on here. (please note: You may install the switch in any
location in the vehicle, so long as you can get two wires to it)
Next, you need to access the brown wire in question. There are a few different
locations that are convenient to do so. Many members have located it under the
driver's seat as seen in this picture:
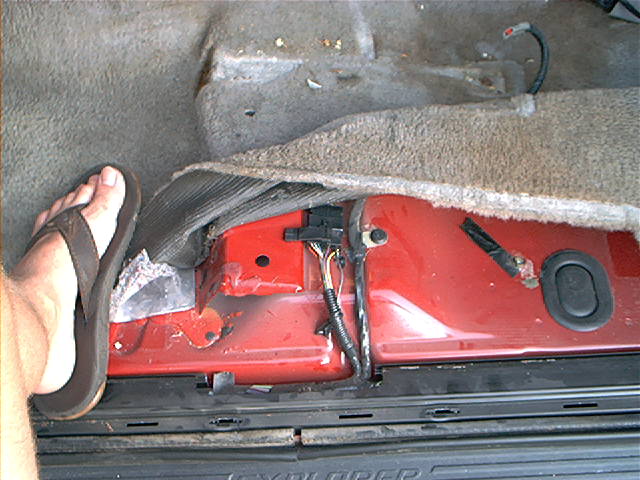
Accessing it only requires pulling the driver's seat out which is not a
difficult job.
The place most people prefer is in the center of the dashboard. To access it,
you will need to remove the stereo using the special tools. Slip the tools into
the holes on the stereo until they click. Pry the tools apart from each other
gently, and it should release the retainer clips. Slide the stereo out of the
opening and unplug the two (or three) plugs on the back, as well as the antenna
wire.
Use the 7mm socket to unscrew the two screws above the HVAC controls. Pull out
on the stereo surround and the clips will pop out. Unplug the connectors for the
rear wiper switch, fog lights, defroster, cigarette lighter terminals, and 4wd
switch.
Once you've got the dash opened up, you'll need to remove the vent duct. Use the
7mm socket and ratchet to remove the two screws at the rear bottom of the duct.
Be careful not to drop them as they're hard to retrieve. (I probably just jinxed
all of you!!) Slide the duct out of the opening.
Now, inside the opening you will see a bunch of wiring harnesses and connectors,
but don't be scared. Here are some things that should look familiar:
To the right of the opening tucked in behind the dash, you'll see the TOD relay
sticking up.
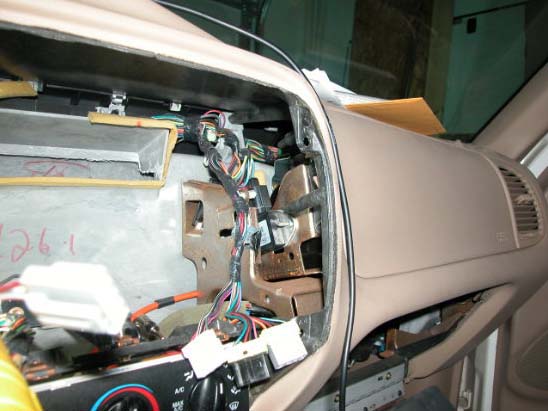
To the left side of the opening, you'll see the GEM attached to the support
bracket.
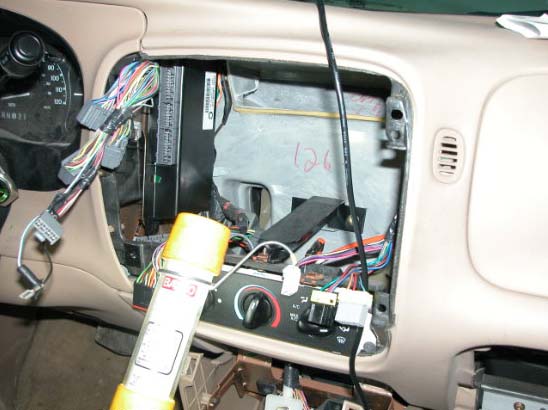
The GEM is held in place with a single screw at the bottom. Yup, you guessed it,
7mm socket and ratchet. On the GEM, there are three connectors: Two on the
front, one on the back. I found it's easier to remove the two on the front, take
the screw out, slide the GEM down to disengage the two tabs on the top, then
rotate the GEM to unplug the rear connector. Remove the GEM and set it aside for
now.
At the top left back corner of the opening, you should see a relatively large
wiring harness.
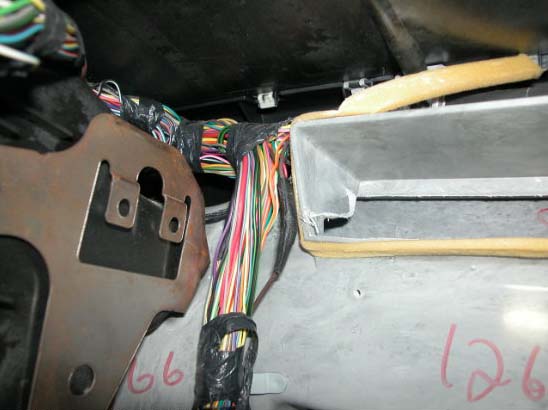
You will need to VERY CAREFULLY remove some of the electrical tape on the
harness to be able to access the brown wire. In this corner, you should find the
spot where the brown wire from the TOD relay meets the brown wire coming up from
the TCS relay. You should be able to pull some wire up from the bottom to gain a
little slack and make it easier to work on.
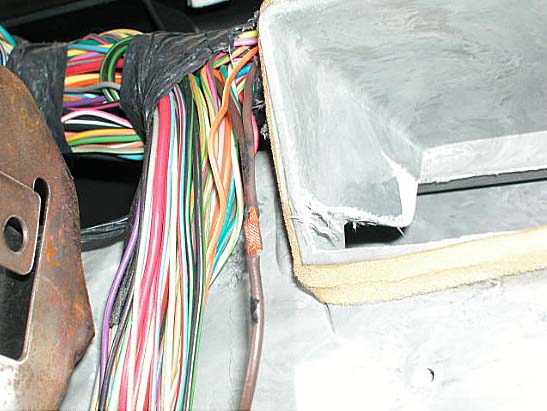
In this picture I've remove the wrap from the splice just so you can see how it
is connected.
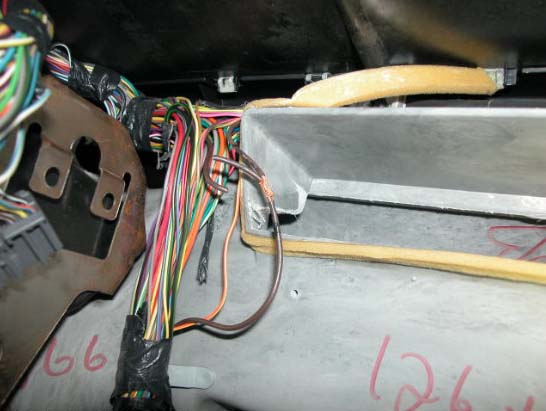
Now, this is the point of no return. Clip the brown wire that goes UP AND TO THE
LEFT from the splice as shown here:
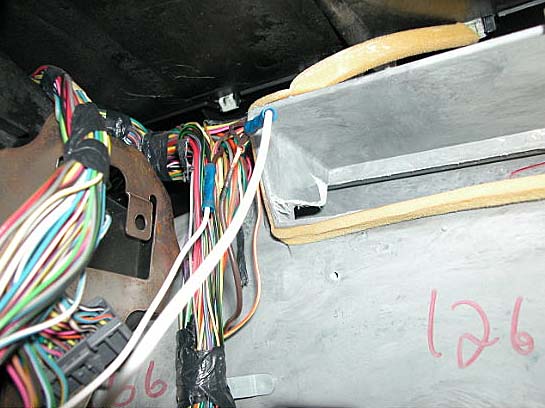
At this point, you need to connect a pair of wires that will run to the switch.
I used a pair of butt-connectors because it was all I had laying around, but I
would recommend using a male and female bullet connector. Should you ever wish
to return it to stock in the future, it's simply a matter of disconnecting the
wires and reconnecting the brown wire to itself.
Once you have selected a location for the switch and drilled/ground/cut a
mounting hole for it, this is where the two systems differ again.
97-01 to disable the control trac.
You can use a simple on/off switch or a lighted on/off switch. Take the wire
connected to the side with the splice and run it to the center terminal on the
switch. Connect the other wire to the other terminal, and you should be in
business. If you have used a lighted switch, you will also need to run a third
wire from the third terminal on the switch to a ground in order for the light to
work.
NOTE: Make sure you know which connections on the switch are the feed and
ground terminals to avoid inadvertently shorting the TCCC signal to ground.
Before you button the dash back up, you'll want to try it out. Connect the 4wd
switch and pop the stereo surround back in place. Take it for a drive. With the
switch in the on position, and if you used a lighted switch, the light should
glow dimly with the key on. Please note: This is normal. 4AUTO should
work the way it used to. (i.e. when you accelerate hard on a loose surface, the
4wd will cycle on and off, and the light will get bright and dim as the system
cycles)
Turn the BWM switch off, and you should be able to spin the rear tires. If so,
everything is working properly. Button everything back up and you're good to go!
You have just completed the Brown Wire Mod for the '97-'01 Explorers. :)
'95-'96 to Engage the 4wd full-time
Access the brown wire and make the connections to the brown wire as described in
the procedure for the '97-'01 Explorers. However, connecting to the switch will
be a little different.
You will need to connect a splice to a power source in order to manually power
the Transfer Case Clutch Coil. I used a Scotch-Lok to splice a wire onto the
existing Cigarette Lighter circuit, but any power source will work, so long as
it can support an additional 5A without blowing its fuse. Make sure to install a
10A fuse in-line as an additional safety. The transfer case clutch coil draws
right around 5A on my truck, so a 10A fuse should be more than sufficient.
If you simply want to add 4high, use an SPDT On-On switch. If you
want the ability to use 2 low as well, use an SPDT ON-off-ON switch.
Please note: If you want to use a lighted switch on a 95-96 and want to
use 2low, you'll need a very specific type of switch (which I can recommend) or
a DPDT switch and separate LED (which you can find at radio shack), and the
wiring gets a little more complicated. It's not difficult, but it's a whole
other discussion for another time. To keep the choices simple, I'll focus on the
first two choices I mentioned here.
For the ON-ON switch to add 4 high:
Connect both wires from the splice to the center terminal on the switch. Then
connect the wire from the auxiliary power source to the other terminal on the
switch. This will allow the system to function normally as it did before, as
well as allow you to send power to the TCCC manually when you turn the switch
on.
Before putting the dash back together, connect the 4wd switch and take it out
for a ride. With the OEM switch set to 4auto, you should feel the system cycle
normally. Then, flip your BWM switch on and the system should be locked in 4wd
high.
Please note: In order to use 4high, the OEM switch must be set to 4auto
first to lock the CAD on the front axle.
For the ON-off-ON switch to add two low:
Connect the wires as shown here: (this shows a DPDT switch, could someone shoot
me a drawing of a SPDT switch? I don't have the patience for Microsoft Paint!!!)

Now, before buttoning it back up, try it out. With the OEM switch set to 4auto
to lock the CAD on the front axle, you should have one switch on position where
the system acts as it did originally (i.e. 4auto). The other on position should
lock the transfer case in 4 high. The off position should disconnect the front
axle regardless of the OEM switch position.
Well, gang, I think that about covers it for now. I'm sure I left something out,
so feel free to refresh my memory if I miss something.
Good Luck!
-Joe
To comment on, or to receive help with this modification:
Click
Here |


